How to Connect Arctis 9X to Xbox: The Ultimate Guide for Gamers
By Mia Phillips
Connecting your Arctis 9X to your Xbox can significantly enhance your gaming experience, but the process might seem daunting if you're unfamiliar with the setup steps. Whether you're a casual gamer or a competitive player, having a reliable wireless headset is essential for clear communication and immersive audio. This guide will walk you through every step of the process, ensuring you can enjoy seamless gameplay with your Arctis 9X.
In today's gaming world, audio quality plays a crucial role in both gameplay performance and overall enjoyment. The Arctis 9X is specifically designed to cater to Xbox users, offering exceptional sound quality and comfort. Understanding how to connect this device properly will ensure you make the most of its features.
Throughout this article, we'll cover everything from basic setup instructions to troubleshooting common connection issues. By the end, you'll be equipped with the knowledge and confidence to connect your Arctis 9X to your Xbox effortlessly. Let's dive in!
Introduction to Arctis 9X
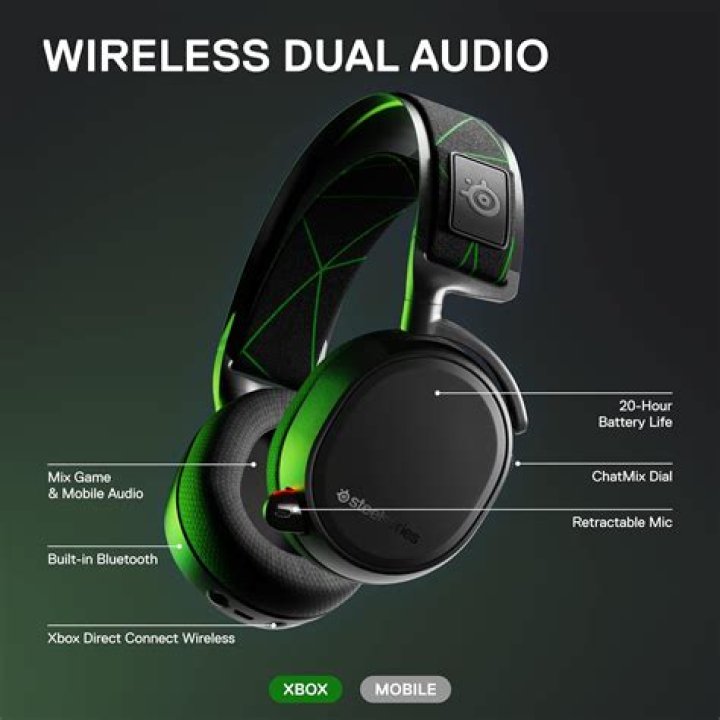
The SteelSeries Arctis 9X is one of the most popular wireless gaming headsets on the market, designed specifically for Xbox consoles. It boasts a range of impressive features, including DTS Headphone:X Surround Sound, a ClearCast bidirectional microphone, and up to 20 hours of battery life. These attributes make it an ideal choice for gamers who prioritize sound quality and comfort during extended gaming sessions.
One of the standout features of the Arctis 9X is its wireless connectivity. Unlike wired headsets, the Arctis 9X allows you to move freely around your gaming setup without being tethered by cables. This convenience is especially beneficial for players who enjoy multiplayer games that require constant communication with teammates.
Before we delve into the connection process, it's important to understand the basics of the Arctis 9X and its compatibility with different Xbox models. This will help you ensure a smooth setup experience.
Arctis 9X Compatibility with Xbox
The Arctis 9X is designed to work seamlessly with all modern Xbox consoles, including the Xbox One, Xbox Series X, and Xbox Series S. However, it's essential to verify that your console's firmware is up to date to avoid any potential compatibility issues. Regular firmware updates from Microsoft often include improvements to peripheral support, ensuring better performance with devices like the Arctis 9X.
Checking Console Compatibility
Here's how you can check if your Xbox console is compatible with the Arctis 9X:
- Ensure your console is running the latest software version.
- Confirm that your console has a USB port for the wireless dongle.
- Verify that your console supports Bluetooth (if you plan to use alternative connectivity methods).
By following these steps, you can ensure your Xbox is ready to pair with the Arctis 9X without any issues. In the next section, we'll explore the setup process in detail.
How to Set Up Arctis 9X for Xbox
Setting up the Arctis 9X for your Xbox is a straightforward process, but it's crucial to follow each step carefully to avoid any connection problems. Below is a step-by-step guide to help you get started:
Step 1: Charge Your Headset
Before attempting to connect your Arctis 9X, make sure it's fully charged. The headset comes with a rechargeable battery that provides up to 20 hours of gameplay on a single charge. Use the included USB-C cable to charge the device until the battery indicator light turns green.
Step 2: Insert the Wireless Dongle
Locate the wireless dongle that came with your Arctis 9X and insert it into an available USB port on your Xbox console. Most modern consoles have multiple USB ports, so choose one that's easily accessible and not obstructed by other peripherals.
Step 3: Power On the Headset
Turn on your Arctis 9X by pressing and holding the power button until you hear a confirmation tone. The LED indicator on the headset should flash to indicate it's searching for a connection.
Step 4: Establish Connection
Once the wireless dongle is inserted and the headset is powered on, the two devices should connect automatically. If the connection doesn't establish within a few seconds, try resetting the headset by holding the power button for 10 seconds and repeating the process.
With these steps, your Arctis 9X should now be successfully connected to your Xbox. In the following section, we'll discuss how to optimize your audio settings for the best possible experience.
Establishing a Wireless Connection
Wireless connectivity is one of the key advantages of the Arctis 9X, offering both convenience and flexibility. However, to ensure a stable connection, it's important to understand the factors that can affect wireless performance.
Factors Affecting Wireless Connection
- Distance: The Arctis 9X has a wireless range of up to 12 meters (40 feet). Ensure your headset remains within this range for optimal performance.
- Interference: Avoid placing the wireless dongle near other electronic devices that emit radio frequencies, as this can cause interference.
- Firmware Updates: Regularly check for firmware updates for both your headset and console to ensure compatibility and performance improvements.
By addressing these factors, you can minimize the risk of connection drops and enjoy a seamless gaming experience. In the next section, we'll explore how to adjust your audio settings for the best sound quality.
Optimizing Audio Settings on Xbox
Once your Arctis 9X is connected to your Xbox, it's time to fine-tune the audio settings to suit your preferences. Proper audio configuration can significantly enhance your gaming experience, providing clearer communication and more immersive sound effects.
Adjusting Audio Balance
On your Xbox, navigate to the settings menu and select "Sound." Here, you can adjust the balance between chat audio and game audio. For competitive games, you may want to prioritize game audio, while casual games might benefit from a more balanced setting.
Enabling Surround Sound
The Arctis 9X supports DTS Headphone:X Surround Sound, which provides a 3D audio experience. To enable this feature, go to the "Audio Output" settings on your Xbox and select "DTS Headphone:X" as your output format. This will unlock the full potential of your headset's surround sound capabilities.
With these adjustments, you can tailor the audio output to match your gaming style and preferences. In the following section, we'll address common connection issues and how to resolve them.
Troubleshooting Common Connection Issues
Even with a well-designed headset like the Arctis 9X, connection issues can occasionally arise. Below are some common problems and their solutions:
Issue 1: No Sound
- Ensure the headset is properly connected to the wireless dongle.
- Check that the Xbox audio output is set to the correct device.
- Restart both the headset and the console to reset the connection.
Issue 2: Intermittent Connectivity
- Move the headset closer to the wireless dongle to reduce interference.
- Unplug any other USB devices that might be causing signal interference.
- Update the firmware for both the headset and the console.
By addressing these issues promptly, you can maintain a stable connection and enjoy uninterrupted gameplay. In the next section, we'll explore the key features that make the Arctis 9X stand out from other gaming headsets.
Key Features of Arctis 9X
The Arctis 9X offers a range of features that cater to the needs of modern gamers. Below are some of its standout attributes:
- DTS Headphone:X Surround Sound: Provides an immersive 3D audio experience for enhanced gameplay.
- ClearCast Bidirectional Microphone: Ensures crystal-clear communication with teammates.
- Up to 20 Hours of Battery Life: Offers extended gameplay without the need for frequent recharging.
- Comfortable Design: Features a lightweight build and plush ear cushions for long gaming sessions.
These features combine to create a headset that's both powerful and comfortable, making it a top choice for gamers of all levels.
Arctis 9X vs Other Headsets
When comparing the Arctis 9X to other gaming headsets on the market, several factors set it apart. Below is a comparison of its key features against popular alternatives:
| Feature | Arctis 9X | Competitor A | Competitor B |
|---|---|---|---|
| Surround Sound | DTS Headphone:X | Basic Stereo | Virtual Surround |
| Battery Life | 20 Hours | 15 Hours | 10 Hours |
| Microphone Quality | ClearCast | Standard | Good |
As the table shows, the Arctis 9X consistently outperforms its competitors in terms of audio quality, battery life, and microphone clarity. In the next section, we'll discuss how to maintain your headset for long-term use.
Maintaining Your Arctis 9X
To ensure your Arctis 9X remains in top condition, regular maintenance is essential. Below are some tips for keeping your headset in excellent working order:
- Clean the ear cushions and headband padding with a soft, damp cloth.
- Store the headset in a dry, dust-free environment when not in use.
- Periodically check the firmware for updates and install them as needed.
By following these maintenance tips, you can extend the lifespan of your Arctis 9X and continue enjoying its superior performance.
Conclusion and Final Tips
In conclusion, connecting your Arctis 9X to your Xbox is a simple process that can greatly enhance your gaming experience. By following the steps outlined in this guide, you can ensure a stable connection and optimize your audio settings for the best possible sound quality. Remember to regularly maintain your headset and address any connection issues promptly to avoid disruptions during gameplay.
We encourage you to share your thoughts and experiences in the comments section below. Have you encountered any unique challenges while setting up your Arctis 9X? What features do you appreciate most about this headset? Your feedback is invaluable to other gamers who may be considering this device.
For more gaming tips and guides, explore our other articles on our website. Happy gaming!