
Patching Large Holes in Wallboard: A Comprehensive Guide for Homeowners
By Michael King
Are you dealing with large holes in your wallboard and unsure where to start? Repairing wallboard can seem intimidating, but with the right tools and techniques, it's a manageable DIY project. Whether you're a seasoned handyman or a first-time homeowner, this guide will walk you through every step of patching large holes in wallboard effectively and efficiently.
Large holes in wallboard are a common issue that many homeowners face. Whether caused by accidents, structural damage, or previous renovations, these holes can significantly impact the appearance and integrity of your walls. However, with the right knowledge and tools, you can restore your walls to their original condition.
This article will provide you with a detailed, step-by-step process to patch large holes in wallboard. We'll cover everything from preparing the damaged area to finishing touches, ensuring your walls look as good as new. Let's dive in!
Understanding Wallboard Basics
Before diving into the repair process, it's essential to understand what wallboard is and how it works. Wallboard, also known as drywall, is a standard material used in constructing interior walls and ceilings. It consists of a gypsum core sandwiched between two layers of heavy paper. Its versatility and affordability make it a popular choice for homeowners and builders alike.
Types of Wallboard
- Standard drywall: The most common type used in residential construction.
- Moisture-resistant drywall: Ideal for bathrooms and other high-moisture areas.
- Fire-resistant drywall: Offers additional fire protection for certain areas of the home.
Understanding the type of wallboard you're working with can help you choose the right materials and techniques for your repair project.
Tools and Materials Needed
Having the right tools and materials is crucial for successfully patching large holes in wallboard. Here's a list of what you'll need:
Tools
- Utility knife
- Screwdriver
- Putty knife
- Sandpaper or sanding block
- Tape measure
Materials
- Drywall patch
- Drywall screws
- Joint compound
- Drywall tape
- Paint and primer
Gathering all your tools and materials beforehand will ensure a smoother repair process and save you time in the long run.
Preparing the Damaged Area
Proper preparation is key to a successful wallboard repair. Start by assessing the damage and ensuring the area is safe to work on. Remove any loose debris or jagged edges around the hole using a utility knife. This will create a clean, square opening that's easier to patch.
Next, check for any underlying issues, such as water damage or structural problems, that may need to be addressed before proceeding with the repair. Addressing these issues upfront will prevent further damage and ensure a long-lasting repair.
Patching Large Holes in Wallboard
Once the damaged area is prepared, it's time to start patching the hole. Follow these steps for a professional-looking repair:
Step 1: Cut a Piece of Drywall Patch
Measure the size of the hole and cut a piece of drywall patch slightly larger than the opening. This will ensure a secure fit and provide stability to the repair.
Step 2: Secure the Patch
Use drywall screws to secure the patch in place. Place the screws around the edges of the patch, ensuring it's flush with the surrounding wallboard. This will help create a smooth surface for the next steps.
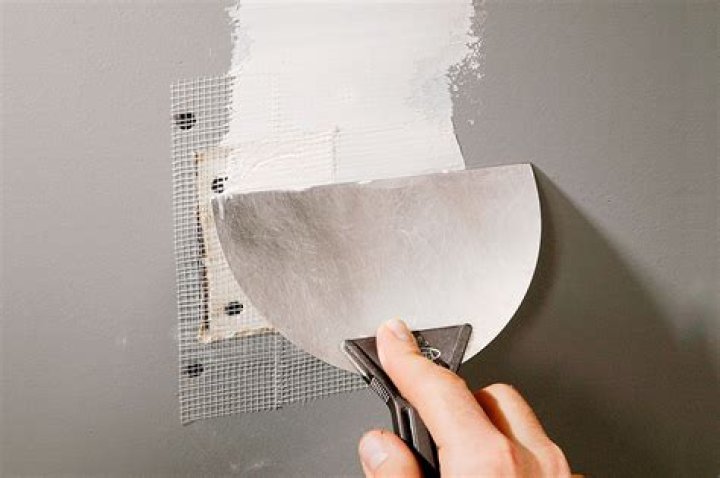
Step 3: Apply Joint Compound
Spread a thin layer of joint compound over the patched area using a putty knife. Be sure to cover the edges of the patch and any screw heads. Allow the compound to dry completely before sanding it smooth.
Finishing Touches for Wallboard Repair
After the joint compound has dried and been sanded, it's time to add the finishing touches. Apply a second layer of joint compound, ensuring it blends seamlessly with the surrounding wall. Once dry, sand the area again for a smooth finish.
Finally, prime and paint the repaired area to match the rest of the wall. This will help hide any imperfections and give your wall a professional appearance. Use high-quality paint and primer for the best results.
Common Problems and Solutions
Even with careful preparation and execution, you may encounter some common issues during your wallboard repair project. Here are a few problems and their solutions:
Problem: Uneven Surface
Solution: Sand the area again and apply another layer of joint compound if necessary. Ensure the compound is evenly spread to avoid any bumps or ridges.
Problem: Visible Patch Edges
Solution: Apply additional joint compound and sand the area until the edges are no longer visible. Feathering the compound outwards can help create a seamless transition.
Problem: Paint Mismatch
Solution: If the repaired area doesn't match the rest of the wall, consider repainting the entire wall for a uniform appearance. Alternatively, use touch-up paint specifically designed for small repairs.
Pro Tips for Wallboard Repair
Here are a few expert tips to help you achieve the best results when patching large holes in wallboard:
- Work in a well-ventilated area to avoid inhaling dust and fumes.
- Use a damp cloth to wipe away excess dust before applying joint compound.
- Apply thin layers of joint compound for a smoother finish.
- Practice on a small, inconspicuous area before tackling larger repairs.
Estimating Costs for Wallboard Repairs
The cost of repairing large holes in wallboard can vary depending on the size of the hole, the materials used, and your location. On average, you can expect to spend between $50 and $200 for materials and tools. Hiring a professional may increase the cost significantly, so consider your skill level and budget before deciding whether to DIY or hire help.
Referencing data from the U.S. Bureau of Labor Statistics and industry reports, DIY repairs can save homeowners up to 50% compared to hiring a contractor. However, ensure you have the necessary skills and experience to avoid costly mistakes.
Maintaining Your Wallboard
To prevent future damage to your wallboard, follow these maintenance tips:
- Avoid hanging heavy objects directly on drywall without proper anchors.
- Regularly inspect walls for signs of moisture or pest damage.
- Keep walls clean and free of dirt and grime to maintain their appearance.
Proactive maintenance can extend the life of your wallboard and save you money on repairs in the long run.
Conclusion
Patching large holes in wallboard is a rewarding DIY project that can significantly improve the appearance and integrity of your walls. By following the steps outlined in this guide, you can achieve professional results and save money on costly repairs. Remember to gather all necessary tools and materials beforehand, prepare the damaged area properly, and take your time during each step of the process.
We encourage you to share your wallboard repair experiences in the comments below. If you found this article helpful, consider sharing it with fellow homeowners or exploring other articles on our site for more home improvement tips.
Source: U.S. Bureau of Labor Statistics, Drywall Installation and Repair Cost Reports